License Statement
Licensed to the Apache Software Foundation (ASF) under one or more contributor license agreements. See the NOTICE file distributed with this work for additional information regarding copyright ownership. The ASF licenses this file to you under the Apache License, Version 2.0 (the "License"); you may not use this file except in compliance with the License. You may obtain a copy of the License at http://www.apache.org/licenses/LICENSE-2.0
Unless required by applicable law or agreed to in writing, software distributed under the License is distributed on an "AS IS" BASIS, WITHOUT WARRANTIES OR CONDITIONS OF ANY KIND, either express or implied. See the License for the specific language governing permissions and limitations under the License.
Revision History
| Version | Date |
|---|---|
2.2.0 |
TBD |
2.1.0 |
May 1, 2017 |
2.0.1 |
July 7, 2016 |
2.0.0 |
June 6, 2016 |
1.3.0 |
January, 2016 |
1. About This Document
This guide describes how to provision the end-user Trafodion binaries on top of an existing Hadoop environment. This install allows you to store and query data using Trafodion, either via Trafodion clients (see Trafodion Client Installation Guide) or via application code you write.
If you want to install a Trafodion developer-build environment, then please refer to the Trafodion Contributor Guide for instructions.
1.1. Intended Audience
This guide assumes that you are well-versed in Linux and Hadoop administration. If you don’t have such experience, then you should consider going through the steps required to install a Hadoop environment before attempting to install Trafodion.
The instructions contained herein apply to the following environments.
-
Single-Node Environments: Typically used when you want to evaluate Trafodion.
-
Cluster (Multi-Node) Environments: Typically used when you deploy Trafodion for application usage.
| Trafodion can be provisioned on a single-node or multi-node environment. Unless specifically noted, the term cluster is used to mean both single- and multi-node environments. |
The provisioning instructions applies to a diverse set of platforms:
-
Virtual Machines: Often used for evaluations and Trafodion development.
-
Cloud: Used for Product Environments as well as for Developer Environments.
-
Bare Metal: Used for Product Environments as well as for Developer Environments.
| The term node is used to represent a computing platform on which operating system, Hadoop, and Trafodion software is running. Unless specifically qualified (bare-metal node, virtual-machine node, or cloud-node), node represents a computing platform in your cluster regardless of platform type. |
1.2. New and Changed Information
This guide has been updated to include Ambari installation.
1.3. Notation Conventions
This list summarizes the notation conventions for syntax presentation in this manual.
-
UPPERCASE LETTERS
Uppercase letters indicate keywords and reserved words. Type these items exactly as shown. Items not enclosed in brackets are required.
SELECT -
lowercase letters
Lowercase letters, regardless of font, indicate variable items that you supply. Items not enclosed in brackets are required.
file-name -
[ ] Brackets
Brackets enclose optional syntax items.
DATETIME [start-field TO] end-fieldA group of items enclosed in brackets is a list from which you can choose one item or none.
The items in the list can be arranged either vertically, with aligned brackets on each side of the list, or horizontally, enclosed in a pair of brackets and separated by vertical lines.
For example:
DROP SCHEMA schema [CASCADE]
DROP SCHEMA schema [ CASCADE | RESTRICT ]
-
{ } Braces
Braces enclose required syntax items.
FROM { grantee [, grantee ] ... }A group of items enclosed in braces is a list from which you are required to choose one item.
The items in the list can be arranged either vertically, with aligned braces on each side of the list, or horizontally, enclosed in a pair of braces and separated by vertical lines.
For example:
INTERVAL { start-field TO end-field } { single-field } INTERVAL { start-field TO end-field | single-field } -
| Vertical Line
A vertical line separates alternatives in a horizontal list that is enclosed in brackets or braces.
{expression | NULL} -
… Ellipsis
An ellipsis immediately following a pair of brackets or braces indicates that you can repeat the enclosed sequence of syntax items any number of times.
ATTRIBUTE[S] attribute [, attribute] ...
{, sql-expression } ...
An ellipsis immediately following a single syntax item indicates that you can repeat that syntax item any number of times.
For example:
expression-n ... -
Punctuation
Parentheses, commas, semicolons, and other symbols not previously described must be typed as shown.
DAY (datetime-expression)
@script-file
Quotation marks around a symbol such as a bracket or brace indicate the symbol is a required character that you must type as shown.
For example:
"{" module-name [, module-name] ... "}" -
Item Spacing
Spaces shown between items are required unless one of the items is a punctuation symbol such as a parenthesis or a comma.
DAY (datetime-expression) DAY(datetime-expression)If there is no space between two items, spaces are not permitted. In this example, no spaces are permitted between the period and any other items:
myfile.sh -
Line Spacing
If the syntax of a command is too long to fit on a single line, each continuation line is indented three spaces and is separated from the preceding line by a blank line.
This spacing distinguishes items in a continuation line from items in a vertical list of selections.
match-value [NOT] LIKE _pattern
   [ESCAPE esc-char-expression]
1.4. Comments Encouraged
We encourage your comments concerning this document. We are committed to providing documentation that meets your needs. Send any errors found, suggestions for improvement, or compliments to user@trafodion.apache.org.
Include the document title and any comment, error found, or suggestion for improvement you have concerning this document.
2. Quick Start
This chapter provides a quick start for how to use the command-line Trafodion Installer to install Trafodion. If you prefer to intall on HDP distribution using Ambari, refer to the Ambari Install section.
You need the following before using the information herein:
-
A supported and running Hadoop enviroment with HDFS, HBase, and Hive. Refer to the Release Notes for information about supported versions.
-
A user ID with passwordless SSH among all the nodes in the cluster. This user ID must have sudo access.
| The Trafodion Installer modifies and restarts your Hadoop environment. |
2.1. Download Binaries
You download the Trafodion binaries from the Trafodion Download page. Download the following packages:
-
Trafodion Installer (if planning to use the Trafodion Installer)
-
Trafodion Server
| You can download and install the Trafodion Clients once you’ve installed and activated Trafodion. Refer to the Trafodion Client Install Guide for instructions. |
Example
Download the Trafodion Installer and Server binaries:
$ mkdir $HOME/trafodion-download
$ cd $HOME/trafodion-download
$ # Download the Trafodion Installer binaries
$ wget http://apache.cs.utah.edu/trafodion/trafodion-2.2.0/apache-trafodion-pyinstaller-2.2.0.tar.gz
Resolving http://apache.cs.utah.edu... 192.168.1.56
Connecting to http://apache.cs.utah.edu|192.168.1.56|:80... connected.
HTTP request sent, awaiting response... 200 OK
Length: 68813 (67K) [application/x-gzip]
Saving to: "apache-trafodion-pyinstaller-2.2.0.tar.gz"

100%[=====================================================================================================================>] 68,813       124K/s   in 0.5s

2016-02-14 04:19:42 (124 KB/s) - "apache-trafodion-pyinstaller-2.2.0.tar.gz" saved [68813/68813]

$ wget http://apache.cs.utah.edu/trafodion/trafodion-2.2.0/apache-trafodion_server-2.2.0-RH-x86_64.tar.gz
Resolving http://apache.cs.utah.edu... 192.168.1.56
Connecting to http://apache.cs.utah.edu|192.168.1.56|:80... connected.
HTTP request sent, awaiting response... 200 OK
Length: 214508243 (205M) [application/x-gzip]
Saving to: "apache-trafodion_server-2.2.0-RH-x86_64.tar.gz"

100%[=====================================================================================================================>] 214,508,243 3.90M/s   in 55s

2016-02-14 04:22:14 (3.72 MB/s) - "apache-trafodion_server-2.2.0-RH-x86_64.tar.gz" saved [214508243/214508243]

$ ls -l
-rw-rw-r--. 1 centos centos     74237 Feb 13 14:53 apache-trafodion_pyinstaller-2.2.0.tar.gz
-rw-rw-r--. 1 centos centos 183114066 Feb 10 22:34 apache-trafodion_server-2.2.0-RH-x86_64.tar.gz
$
2.2. Unpack Installer and Server package
The first step in the installation process is to unpack the Trafodion Installer tar file. Trafodion server package tar file can be auto detected by installer if put it in installer’s folder.
Example
$ mkdir $HOME/trafodion-installer
$ cd $HOME/trafodion-downloads
$ tar -zxf apache-trafodion-pyinstaller-2.2.0.tar.gz -C $HOME/trafodion-installer
$ cp -f apache-trafodion_server-2.2.0-RH-x86_64.tar.gz $HOME/trafodion-installer
$ ls $HOME/trafodion-installer/python-installer
apache-trafodion_server-2.2.0-RH-x86_64.tar.gz  db_install.py    LICENSE  prettytable.py  scripts
configs                                                    db_uninstall.py  discovery.py  NOTICE   README.md
$
2.3. Collect Information
Collect/decide the following information:
2.3.1. Java Location
Java location can be automatically detected by installer. You need to provide the java location only if installer cannot detect it.
How to detect java location manually:
-
Login to trafodion' node
-
Use
ps -ef | grep java | grep hadoop | grep hbaseto determine what version HBase is running.
Example
ps -ef | grep java | grep hadoop | grep hbase
hbase     17302  17288  1 20:35 ?        00:00:10 /usr/jdk64/jdk1.7.0_67/bin/java -Dproc_master -XX:OnOutOfMemoryError=kill -9 %p -Dhdp.version=2.3.6.0-3796 -XX:+UseConcMarkSweepGC -XX:ErrorFile=/var/log/hbase/hs_err_pid%p.log -Djava.io.tmpdir=/tmp -verbose:gc -XX:+PrintGCDetails -XX:+PrintGCDateStamps -Xloggc:/var/log/hbase/gc.log-201606302035 -Xmx1024m -XX:PermSize=128m -XX:MaxPermSize=128m -Dhbase.log.dir=/var/log/hbase -Dhbase.log.file=hbase-hbase-master-ip-172-31-56-238.log -Dhbase.home.dir=/usr/hdp/current/hbase-master/bin/.. -Dhbase.id.str=hbase -Dhbase.root.logger=INFO,RFA -Djava.library.path=:/usr/hdp/2.3.6.0-3796/hadoop/lib/native/Linux-amd64-64:/usr/hdp/2.3.6.0-3796/hadoop/lib/native -Dhbase.security.logger=INFO,RFAS org.apache.hadoop.hbase.master.HMaster start
The Java location is: /usr/jdk64/jdk1.7.0_67
2.3.2. Data Nodes
Trafodion is installed on all data nodes in your Hadoop cluster. Data nodes can be automatically detected by installer while installing on a HDP/CDH cluster.
You need to record hostname for each node when you install Trafodion on Apache Hadoop.
For example, refer to /etc/hosts.
Example
$ cat /etc/hosts
127.0.0.1   localhost localhost.localdomain localhost4 localhost4.localdomain4
::1         localhost localhost.localdomain localhost6 localhost6.localdomain6

172.31.56.238              node-1.internal node-1
172.31.61.110              node-2.internal node-2
Record the node names in a comma-separated list node-1, node-2 or in regular expression mode node-[1-2]
2.3.3. Distribution Manager URL
The Installer interacts with the Distribution Manager (for example, Apache Ambari or Cloudera Manager) to modify the Hadoop configuration.
Example
Apache Ambari URL
http://myhost.com:80802.4. Run Installer
You run the Installer once you’ve collected the base information as described in Collect Information above.
Please refer to Guided Install for the example of installing Trafodion on a two-node Cloudera Hadoop cluster.
3. Introduction
Trafodion is a Hadoop add-on service that provides transactional SQL on top of HBase. Typically, you use Trafodion as the database for applications that require Online Transaction Processing (OLTP), Operational Data Store (ODS), and/or strong reporting capabilities. You access Trafodion using standard JDBC and ODBC APIs.
You may choose whether to add Trafodion to an existing Hadoop environment or to create a standalone Hadoop environment specifically for Hadoop.
This guide assumes that a Hadoop environment exists upon which your provisioning Trafodion. Refer to Hadoop Software for information about what Hadoop software is required Trafodion.
3.1. Security Considerations
The following users and principals need be considered for Trafodion:
-
Provisioning User: A Linux-level user that performs the Trafodion provisioning tasks. This user ID requires
sudoaccess and passwordless ssh among the nodes where Trafodion is installed. In addition, this user ID requires access to Hadoop distribution, HDFS, and HBase administrative users to change respective environment’s configuration settings per Trafodion requirements. Refer to Trafodion Provisioning User for more information about the requirements and usage associated with this user ID. -
Runtime User: A Linux-level user under which the Trafodion software runs, default name is
trafodion. This user ID must be registered as a user in the Hadoop Distributed File System (HDFS) to store and access objects in HDFS, HBase, and Hive. In addition, this user ID requires passwordless access among the nodes where Trafodion is installed. Refer to Trafodion Runtime User for more information about this user ID. -
Trafodion Database Users: Trafodion users are managed by Trafodion security features (grant, revoke, etc.), which can be integrated with LDAP if so desired. These users are referred to as database users and do not have direct access to the operating system. Refer to LDAP for details on enabling LDAP for authenticating database users. Refer to Register User, Grant, and other SQL statements in the Trafodion SQL Reference Manual for more information about managing Trafodion Database Users.
If your environment has been provisioned with Kerberos, then the following additional information is required. -
KDC admin principal: Trafodion requires administrator access to Kerberos to create principals and keytabs for the
trafodionuser, and to look-up principal names for HDFS and HBase keytabs. Refer to Kerberos for more information about the requirements and usage associated with this principal. -
HBase keytab location: Trafodion requires administrator access to HBase to grant required privileges to the
trafodionuser. Refer to Kerberos for more information about the requirements and usage associated with this keytab. -
HDFS keytab location: Trafodion requires administrator access to HDFS to create directories that store files needed to perform SQL requests such as data loads and backups. Refer to Kerberos for more information about the requirements and usage associated with this keytab.
If your environment is using LDAP for authentication, then the following additional information is required. -
LDAP username for database root access: When Trafodion is installed, it creates a predefined database user referred to as the DB__ROOT user. In order to connect to the database as database root, there must be a mapping between the database user DB__ROOT and an LDAP user. Refer to LDAP for more information about this option.
-
LDAP search user name: Trafodion optionally requests an LDAP username and password in order to perform LDAP operations such as LDAP search. Refer to LDAP for more information about this option.
3.2. Provisioning Options
Trafodion includes two options for installation: a plug-in integration with Apache Ambari and command-line installation scripts.
The Ambari integration provides support for Hortonworks Hadoop distributions, while the command-line Trafodion Installer supports Cloudera and Hortonworks Hadoop distributions, and for select vanilla Hadoop installations.
The Trafodion Installer supports Linux distributions SUSE and RedHat/CentOS. There are, however, some differences. Prerequisite software packages are not installed automatically on SUSE.
The Trafodion Installer automates many of the tasks required to install/upgrade Trafodion, from downloading and installing required software packages and making required configuration changes to your Hadoop environment via creating the Trafodion runtime user ID to installing and starting Trafodion. It is, therefore, highly recommend that you use the Trafodion Installer for initial installation and upgrades of Trafodion. These steps are referred to as "Script-Based Provisioning" in this guide. Refer to Trafodion Installer that provides usage information.
3.3. Provisioning Activities
Trafodion provisioning is divided into the following main activities:
-
Requirements: Activities and documentation required to install the Trafodion software. These activities include tasks such as understanding hardware and operating system requirements, Hadoop requirements, what software packages that need to be downloaded, configuration settings that need to be changed, and user ID requirements.
-
Prepare: Activities to prepare the operating system and the Hadoop ecosystem to run Trafodion. These activities include tasks such as installing required software packages, configure the Trafodion Installation User, gather information about the Hadoop environment, and the modify configuration for different Hadoop services.
-
Install: Activities related to installing the Trafodion software. These activities include tasks such as unpacking the Trafodion tar files, creating the Trafodion Runtime User, creating Trafodion HDFS directories, installing the Trafodion software, and enabling security features.
-
Upgrade: Activities related to the upgrading the Trafodion software. These activities include tasks such as shutting down Trafodion and installing a new version of the Trafodion software. The upgrade tasks vary depending on the differences between the current and new release of Trafodion. For example, an upgrade may or may not include an upgrade of the Trafodion metadata.
-
Activate: Activities related to starting the Trafodion software. These actives include basic management tasks such as starting and checking the status of the Trafodion components and performing basic smoke tests.
-
Remove: Activities related to removing Trafodion from your Hadoop cluster.
3.4. Provisioning Master Node
All provisioning tasks are performed from a single node in the cluster, which can be any node as long as it has access to the Hadoop environment you’re adding Trafodion to. This node is referred to as the "Provisioning Master Node" in this guide.
The Trafodion Provisioning User must have access to all other nodes from the Provisioning Master Node in order to perform provisioning tasks on the cluster.
3.5. Trafodion Installer
The Trafodion Installer is a set of scripts automates most of the tasks requires to install/upgrade Trafodion. You download the Trafodion Installer tar file from the Trafodion download page. Next, you unpack the tar file.
Example
$ mkdir $HOME/trafodion-installer
$ cd $HOME/trafodion-downloads
$ tar -zxf apache-trafodion-pyinstaller-2.2.0.tar.gz -C $HOME/trafodion-installer
$
The Trafodion Installer supports two different modes:
-
Guided Setup: Prompts for information as it works through the installation/upgrade process. This mode is recommended for new users.
-
Automated Setup: Required information is provided in a pre-formatted ini configuration file, which is provided via a command argument when running the Trafodion Installer thereby suppressing all prompts. This ini configuration file only exists on the Provisioning Master Node, please secure this file or delete it after you installed Trafodion successfully.
A template of the configuration file is available here within the installer directory:
configs/db_config_default.ini. Make a copy of the file in your directory and populate the needed information.Automated Setup is recommended since it allows you to record the required provisioning information ahead of time. Refer to Automated Setup for information about how to populate this file.
3.5.1. Usage
The following shows help for the Trafodion Installer.
$ ./db_install.py -h
**********************************
  Trafodion Installation ToolKit
**********************************
Usage: db_install.py [options]
  Trafodion install main script.

Options:
  -h, --help            show this help message and exit
  -c FILE, --config-file=FILE
                        Json format file. If provided, all install prompts
                        will be taken from this file and not prompted for.
  -u USER, --remote-user=USER
                        Specify ssh login user for remote server,
                        if not provided, use current login user as default.
  -v, --verbose         Verbose mode, will print commands.
  --silent              Do not ask user to confirm configuration result
  --enable-pwd          Prompt SSH login password for remote hosts.
                        If set, 'sshpass' tool is required.
  --build               Build the config file in guided mode only.
  --reinstall           Reinstall Trafodion without restarting Hadoop.
  --apache-hadoop       Install Trafodion on top of Apache Hadoop.
  --offline             Enable local repository for offline installing
                        Trafodion.
3.5.2. Install vs. Upgrade
The Trafodion Installer automatically detects whether you’re performing an install
or an upgrade by looking for the Trafodion Runtime User in the /etc/passwd file.
-
If the user ID doesn’t exist, then the Trafodion Installer runs in install mode.
-
If the user ID exists, then the Trafodion Installer runs in upgrade mode.
-
If
--reinstalloption is specified, then the Trafodion Installer will not restart Hadoop. It’s only available when you reinstall the same release version, otherwise an error will be reported during installation.
3.5.3. Guided Setup
By default, the Trafodion Installer runs in Guided Setup mode, which means that it prompts you for information during the install/upgrade process.
Refer to the following sections for examples:
3.5.4. Automated Setup
The --config-file option runs the Trafodion in Automated Setup mode.
Before running the Trafodion Installer with this option, you do the following:
-
Copy the
db_config_default.inifile.Example
cp configs/db_config_default.ini my_config -
Edit the new file using information you collect in the Gather Configuration Information section in the Prepare chapter.
-
Run the Trafodion Installer in Automated Setup Mode
Example
./db_install.py --config-file my_config
| Your Trafodion Configuration File contains the password for the Trafodion Runtime User and for the Distribution Manager. Therefore, we recommend that you secure the file in a manner that matches the security policies of your organization. |
Example: Quick start using a Trafodion Configuration File
The Trafodion Installer supports a minimum configuration to quick start your installation in two steps:
-
Copy Trafodion server binary file to your installer directory.
Example
cp /path/to/apache-trafodion_server-2.2.0-RH-x86_64.tar.gz python-installer/ -
Modify configuration file
my_config, add the Hadoop Distribution Manager URL inmgr_url.Example
mgr_url = 192.168.0.1:8080Once completed, run the Trafodion Installer with the --config-file option.
Example: Creating a Trafodion Configuration File
Using the instructions in Gather Configuration Information
in the Prepare chapter, record the information and edit my_config to contain the following:
[dbconfigs]
# NOTICE: if you are using CDH/HDP hadoop distro,
# you can only specifiy management url address for a quick install

##################################
# Common Settings
##################################

# trafodion username and password
traf_user = trafodion
traf_pwd = traf123
# trafodion user's home directory
home_dir = /home
# the directory location of trafodion binary
# if not provided, the default value will be {package_name}-{version}
traf_dirname =

# trafodion used java(JDK) path on trafodion nodes
# if not provided, installer will auto detect installed JDK
java_home =

# cloudera/ambari management url(i.e. http://192.168.0.1:7180 or just 192.168.0.1)
# if 'http' or 'https' prefix is not provided, the default one is 'http'
# if port is not provided, the default port is cloudera port '7180'
mgr_url = 192.168.0.1:8080
# user name for cloudera/ambari management url
mgr_user = admin
# password for cloudera/ambari management url
mgr_pwd = admin
# set the cluster number if multiple clusters managed by one Cloudera manager
# ignore it if only one cluster being managed
cluster_no = 1

# trafodion tar package file location
# no need to provide it if the package can be found in current installer's directory
traf_package =
# the number of dcs servers on each node
dcs_cnt_per_node = 4

# scratch file location, seperated by comma if more than one
scratch_locs = $TRAF_VAR

# start trafodion instance after installation completed
traf_start = Y

##################################
# DCS HA configuration
##################################

# set it to 'Y' if enable DCS HA
dcs_ha = N
# if HA is enabled, provide floating ip, network interface and the hostname of backup dcs master nodes
dcs_floating_ip =
# network interface that dcs used
dcs_interface =
# backup dcs master nodes, seperated by comma if more than one
dcs_backup_nodes =

##################################
# Offline installation setting
##################################

# set offline mode to Y if no internet connection
offline_mode = N
# if offline mode is set, you must provide a local repository directory with all needed RPMs
local_repo_dir =

##################################
# LDAP security configuration
##################################

# set it to 'Y' if enable LDAP security
ldap_security = N
# LDAP user name and password to be assigned as DB admin privilege
db_admin_user = admin
db_admin_pwd = traf123
# LDAP user to be assigned DB root privileges (DB__ROOT)
db_root_user = trafodion
# if LDAP security is enabled, provide the following items
ldap_hosts =
# 389 for no encryption or TLS, 636 for SSL
ldap_port = 389
ldap_identifiers =
ldap_encrypt = 0
ldap_certpath =

# set to Y if user info is needed
ldap_userinfo = N
# provide if ldap_userinfo = Y
ladp_user =
ladp_pwd =

##################################
# Kerberos security configuration
##################################
# if kerberos is enabled in your hadoop system, provide below info

# KDC server address
kdc_server =
# include realm, i.e. admin/admin@EXAMPLE.COM
admin_principal =
# admin password for admin principal, it is used to create trafodion user's principal and keytab
kdcadmin_pwd =
Once completed, run the Trafodion Installer with the --config-file option.
Refer to the following sections for examples:
3.6. Trafodion Provisioning Directories
Trafodion stores its provisioning information in the following directories on each node in the cluster:
-
/etc/trafodion: Configuration information.
4. Requirements
Trafodion requires an x86 version of Linux.
The current release of Trafodion has been tested with:
-
64-bit Red Hat Enterprise Linux (RHEL) or CentOS 6.5 - 6.8
-
Cloudera CDH 5.4 - 5.7
-
Hortonworks HDP 2.3 - 2.4
Other OS releases may work, too. The Trafodion project is currently working on better support for more distribution and non-distribution versions of Hadoop.
4.1. General Cluster and OS Requirements and Recommendations
64-bit x86 instruction set running a Linux distribution is required. Further, Trafodion assumes an environment based on the requirements of the tested Hadoop distributions/services.
4.1.1. Hardware Requirements and Recommendations
Single-Node Cluster
It is possible to run Trafodion on a single-node sandbox environment. Typically, any sandbox running a Hadoop distribution can be used. A typical single-node configuration uses 4-8 cores with 16 GB of memory, and 20 GB free disk space.
Multi-Node Cluster
For multi-node end-user clusters, your typical HBase environment should suffice for Trafodion. Typically, memory configuration range between 64-128 GB per node with minimum requirement of 16 GB. The cluster size can span from 1 to n nodes; a minimum of two nodes is recommended. A minimum of two cores is required regardless of whether you’re deploying Trafodion on a bare-metal or virtual environment.
Recommended configurations:
| Attribute | Guidance |
|---|---|
Processors per Node |
• Small: 2 cores |
Memory per Node |
• Small: 16 GB |
Concurrency:Nodes |
• Two Small Nodes: Four concurrent queries |
4.1.2. OS Requirements and Recommendations
Please verify these requirements on each node you will install Trafodion on:
| Function | Requirement | Verification Guidance |
|---|---|---|
Linux |
64-bit version of Red Hat(RHEL) or CentOS 6.5 -6.8 |
|
sshd |
The |
• |
ntpd |
The |
• |
FQDN |
• |
• |
Port Availability |
The Linux Kernel Firewall ( |
• |
passwordless ssh |
The user name used to provision Trafodion must have passwordless ssh access to all nodes. |
ssh to the nodes, ensure that no password prompt appears. |
sudo privileges |
The user name used to provision Trafodion must sudo access to a number of root functions . |
|
bash |
Available for shell-script execution. |
|
java |
Available to run the Trafodion software. Same version as HBase is using. |
|
perl |
Available for script execution. |
|
python |
Available for script execution. |
|
yum |
Available for installs, updates, and removal of software packages. |
|
rpm |
Available for installs, updates, and removal of software packages. |
|
scp |
Available to copy files among nodes in the cluster. |
|
4.1.3. IP Ports
The following table lists the default ports used by the different Trafodion components plus the configuration file and configuration attribute associated with each port setting.
| Default Port | Configuration File | Configuration Entry | Required | Range | Protocol | Comment |
|---|---|---|---|---|---|---|
4200 |
rest-site.xml |
trafodion.rest.port |
Yes |
1 |
REST |
Trafodion REST Server. |
4201 |
rest-site.xml |
trafodion.rest.https.port |
Yes |
1 |
HTTPS |
Trafodion REST Server (HTTPS). |
23400 |
dcs-site.xml |
dcs.master.port |
Yes |
n |
binary |
Start of Trafodion DCS port range. (37800 for Trafodion 1.1) |
24400 |
dcs-site.xml |
dcs.master.info.port |
Yes |
1 |
HTTP |
DCS master web GUI. (40010 for Trafodion 1.1) |
24410 |
dcs-site.xml |
dcs.server.info.port |
Yes |
n |
HTTP |
Start of range for DCS server web GUIs. (40030 for Trafodion 1.1) |
50030 |
mapred-site.xml |
mapred.job.tracker.http.address |
No |
1 |
HTTP |
MapReduce Job Tracker web GUI. |
50070 |
hdfs-site.xml |
dfs.http.address |
No |
1 |
HTTP |
HDFS Name Node web GUI. |
50075 |
hdfs-site.xml |
dfs.datanode.http.address |
No |
1 |
HTTP |
HDFS Data Node web GUI. |
50090 |
hdfs-site.xml |
dfs.secondary.http.address |
No |
1 |
HTTP |
HDFS Secondary Name Node web GUI. |
60010 |
hbase-site.xml |
hbase.master.info.port |
No |
1 |
HTTP |
HBase Master web GUI. |
60030 |
hbase-site.xml |
hbase.regionserver.info.port |
No |
1 |
HTTP |
HBase Region Server web GUI. |
There are two port ranges used by Trafodion.
-
23400 is a range, to allow multiple mxosrvr processes on each node. Allow a range of a few ports, enough to cover all the servers per node that are listed in the "servers" file in the DCS configuration directory.
-
24410 is a range as well, enough to cover the DCS servers per node, usually 1 or 2.
On top of the ports identified above, you also need the ports required by your Hadoop distribution. For example:
If you have Kerberos or LDAP enabled, then ports required by these products need to be opened as well.
Although not all the ports will be used on every node of the cluster, you need to open most of them for all the nodes in the cluster that have Trafodion, HBase, or HDFS servers on them.
4.2. Prerequisite Software
4.2.1. Hadoop Software
Trafodion runs as an add-on service on Hadoop distributions. The following Hadoop services and their dependencies must be installed and running on the cluster where you intend to install Trafodion:
-
Hadoop Distributed File System (HDFS)
-
ZooKeeper
-
HBase
-
Hive
-
Apache Ambari (Hortonworks) or Cloudera Manager (Cloudera) with associated embedded databases.
4.2.2. Software Packages
In addition to the software packages required to run different Hadoop services listed above (for example, Java),
Trafodion requires supplementary software to be installed on the cluster before it is installed. These are Linux
tools that are not typically packaged as part of the core Linux distribution.
| For RedHat/CentOS, the Trafodion Installer automatically attempts get a subset of these packages over the Internet. If the cluster’s access to the Internet is disabled, then you need to manually download the packages and make them available for installation. |
| Package | Usage | Installation |
|---|---|---|
EPEL |
Add-on packages to completed the Linux distribution. |
Download Fedora RPM |
pdsh |
Parallelize shell commands during install and Trafodion runtime utilities. |
yum install pdsh |
sqlite |
Internal configuration information managed by the Trafodion Foundation component. |
yum install sqlite |
expect |
Not used? |
yum install expect |
perl-DBD-SQLite |
Allows Perl scripts to connect to SQLite. |
yum install perl-DBD-SQLite |
perl-Params-Validate |
Validates method/function parameters in Perl scripts. |
yum install perl-Params-Validate |
perl-Time-HiRes |
High resolution alarm, sleep, gettimeofday, interval timers in Perl scripts. |
yum install perl-Time-HiRes |
protobuf |
Data serialization. |
yum install protobuf |
xerces-c |
C++ XML parsing. |
yum install xerces-c |
gzip |
Data compress/decompress. |
yum install gzip |
apr-devel |
Support files used to build applications using the APR library. |
yum install apr-devel |
apr-util-devel |
Support files used to build applications using the APR utility library. |
yum install apr-util-devel |
The Trafodion Installer requires both Internet access/Offline mode to install the required software packages.
Specify db_install.py --offline to use the offline install feature. Before that, you need to prepare a local repository
folder for all the above dependencies.
To create a local repository, be sure the createrepo package is installed, then run createrepo command in your rpm folder.
$ createrepo -d .4.3. Trafodion User IDs and Their Privileges
4.3.1. Trafodion Runtime User
The trafodion:trafodion user ID is created as part of the installation process. The default password is: traf123.
Trafodion requires that either HDFS ACL support or Kerberos is enabled. The Trafodion Installer will enable HDFS ACL and Kerberos support. Refer to Kerberos for more information about the requirements and usage of Kerberos in Trafodion. Refer to Apache HBase™ Reference Guide for security in HBase.
Do not create the trafodion:trafodion user ID in advance. The Trafodion Installer uses the presence of this user ID to determine
whether you’re doing an installation or upgrade.
|
4.3.2. Trafodion Provisioning User
Typically, the Trafodion Installer is used for Trafodion installations. It requires access to the user IDs documented below.
Linux Installation User
The user ID that performs the Trafodion installation steps. Typically, this User ID runs the Trafodion Installer.
Requirements:
-
User name or group cannot be
trafodion. -
Passwordless ssh access to all nodes in the cluster.
-
Internet access to download software packages.
-
requirettymust be disabled in/etc/sudoers. -
sudo1 access to:-
Download and install software packages.
-
Modify
/etc/sudoers.d(allow thetrafodionuser to modify floating IP:ipandarping). -
Create the
trafodionuser ID and group. -
Install Trafodion software into the HBase environment.
-
Run Java version command on each node in the cluster.
-
Run Hadoop version command on each node in the cluster.
-
Run HBase version command on each node in the cluster.
-
Create directories and files in
/etc/trafodion: -
Invoke
suto execute commands as other users; for example,trafodion. -
Edit
sysctl.confand activate changes usingsysctl -p:-
Modify kernel limits.
-
Reserve IP ports.
-
-
1 sudo is required in the current release of Trafodion. This restriction may be relaxed in later releases.
Alternative mechanisms for privileged access (such as sudo alternative commands) are not supported.
Distribution Manager User
A user ID that can change the configuration using Apache Ambari or Cloudera Manager. The Trafodion Installer makes REST request to perform configuration and control functions to the distribution manager using this user ID.
Requirements:
-
Administrator user name and password.
-
URL to Distribution Manager’s REST API.
HDFS Administrator User
The HDFS super user. Required to create directories and change security settings, as needed.
The Trafodion Installer uses su to run commands under this user ID.
Requirements:
-
HDFS Administrator user name.
-
Write access to home directory on the node where the Distribution Manager is running.
-
For Kerberos enabled installations, location of the keytab for the HDFS service principal.
HBase Administrator User
The HBase super user. Required to change directory ownership in HDFS. For Kerberos enabled installations, the HBase super user is needed to grant the trafodion user create, read, write, and execute privileges.
Requirements:
-
HBase Administrator user name and group.
-
Read access to
hbase-site.xml. -
For Kerberos enabled installations, location of the keytab for the HBase service principal.
Kerberos Administrator User
The Kerberos adminstrator. Required to create Trafodion principals and keytabs on a cluster where Kerberos is enabled.
Requirements:
-
Kerberos Administrator admin name including the realm.
-
Kerberos Administrator password
4.4. Recommended Configuration Changes
The following configuration changes are recommended but not required.
| The Trafodion Installer does not make these changes. |
4.4.1. Recommended Security Changes
The trafodion user ID should not be given other sudo privileges than what’s specified in this manual. Also, we
recommend that this user ID is locked (sudo passwd -l trafodion) once the installation/upgrade activity has been completed.
Users that need issue commands as the trafodion ID should do so using sudo; for example, sudo -u trafodion -i.
4.4.2. Recommended HDFS Configuration Changes
These settings are configured in the hadoop-env.sh file.
| Property | Recommended Setting | Guidance |
|---|---|---|
DataNode Java Heap Size |
2 GB |
Use this setting for a large configuration. |
NameNode Java Heap Size |
2 GB |
Use this setting for a large configuration. |
Secondary NameNode Java Heap Size |
2 GB |
Use this setting for a large configuration. |
4.4.3. Recommended HBase Configuration Changes
| Configuration Property | Recommended Setting | Guidance |
|---|---|---|
hbase.rpc.timeout |
10 minutes |
This setting depends on the tables' size. Sixty (60) seconds is the default.
Increase this value for big tables. Make it the same value as |
hbase.client.scanner.timeout.period |
10 minutes |
Similar to the |
hbase.snapshot.master.timeoutMillis and hbase.snapshot.region.timeout |
10 minutes |
HBase’s default setting is 60000 milliseconds. If you experience timeout issues with HBase snapshots when you use the Trafodion Bulk Loader or other statements, you can set the value for these two HBase properties to 10 minutes (600,000 milliseconds). |
hbase.hregion.max.filesize |
107374182400 bytes |
HBase’s default setting is 10737418240 bytes (10 GB). You can increase the setting to 107374182400 bytes (100 GB), which reduces the number of HStoreFiles per table and appears to reduce disruptions to active transactions from region splitting. |
hbase.hregion.memstore.block.multiplier |
7 When you have enough memory, you can increase this value to 7 so that more data can be temporarily accepted before flushing to disk instead of blocking writes. |
This property blocks any further writes from clients to memstores if the memstores exceed the value of Default value: 2 |
hbase.hregion.memstore.flush.size |
536870912 bytes |
HBase uses memstore to buffer data before writing it to disk. Once the data in memstore has outgrown this size, it is flushed as an HFile to disk. Default value: 134217728 bytes (128M) |
hbase.hstore.blockingStoreFiles |
200 |
http://gbif.blogspot.com/2012/07/optimizing-writes-in-hbase.html This property blocks any further writes from memstores to HFile, after the number of existing HFile hits this limit, until compactions are completed. Default value: 7 |
hbase.regionserver.handler.count |
<num> |
This setting should match the number of concurrent sessions (mxosrvr). The default is 10. |
hbase.regionserver.region.split.policy |
Once the regions reach the maximum size configured by |
Specify the split policy of HBase. Default value: |
5. Prepare
You need to prepare your Hadoop environment before installing Trafodion.
5.1. Install Optional Workstation Software
If you are using a Windows workstation, then the following optional software helps installation process. We recommended that you pre-install the software before continuing with the Trafodion installation:
-
putty and puttygen (download from PuTTY web site)
-
VNC client (download from RealVNC web site)
-
Firefox or Chrome browser
-
SFTP client to transfer files from your workstation to the Linux server: WinSCP or FileZilla
5.2. Configure Installation User ID
If using the command-line Installer, Trafodion installation requires a user ID with these attributes:
-
sudoaccess per the requirements documented in Linux Installation User. -
passwordless ssh to all nodes on the cluster where Trafodion will be installed.
| You may need to request permission from your cluster-management team to obtain this type of access. |
The following example shows how to set up your user ID to have "passwordless ssh" abilities.
Do the following on the Provision Master Node:
echo -e 'y\n' | ssh-keygen -t rsa -N "" -f $HOME/.ssh/id_rsa
cat $HOME/.ssh/id_rsa.pub >> $HOME/.ssh/authorized_keys
echo localhost $(cat /etc/ssh/ssh_host_rsa_key.pub) >> $HOME/.ssh/known_hosts
echo "NoHostAuthenticationForLocalhost=yes" >> $HOME/.ssh/config
chmod 600 $HOME/.ssh/config
chmod 600 $HOME/.ssh/authorized_keys
chmod 700 $HOME/.ssh/
After running these commands, do the following:
-
If necessary, create the
$HOME/.sshdirectory on the other nodes in your cluster and secure it private to yourself (chmod 700). -
If necessary, create the
$HOME/.ssh/authorized_keysfile on the other nodes in your cluster. Secure it withchmod 600 $HOME/.ssh/authorized_keys. -
Copy the content of the
$HOME/.ssh/id_rsa.pubfile on the Provisioning Master Node and append the to the$HOME/.ssh/authorized_keysfile on the other nodes in your cluster. -
sshto the other nodes in the cluster. Answeryto the prompt asking you whether to continue the connection. This adds the node to the$HOME/.ssh/known_hostsfile completing the passwordless ssh setup.
5.3. Disable requiretty
If using the command-line Installer,
you need to disable requiretty in /etc/sudoers on all nodes in the cluster
to ensure that sudo commands can be run from inside the installation scripts.
Comment out the Defaults requiretty setting in the /etc/sudoers file to
ensure that the requiretty option is NOT being used.
5.4. Verify OS Requirements and Recommendations
Please ensure that the OS Requirements and Recommendations are met for each node in the cluster where you intend to install Trafodion.
5.5. Configure Kerberos
If your Hadoop installation has enabled Kerberos, then Trafodion needs to have Kerberos enabled. If not, then Trafodion will not run. If you plan to enable Kerberos in Trafodion, then you need to have access to a KDC (Kerberos Key Distribution Center) and administration credentials so you can create the necessary Trafodion principals and keytabs.
If you wish to manually set up and activate Kerberos principals and keytabs, then refer to the section on Kerberos.
5.6. Configure LDAP Identity Store
If you plan to enable security features in Trafodion, then you need to have an LDAP identity store available to perform authentication. The Trafodion Installer prompts you to set up an authentication configuration file that points to an LDAP server (or servers), which enables security (that is, authentication and authorization) in the Trafodion database.
If you wish to manually set up the authentication configuration file and enable security, then refer to the section on LDAP.
5.7. Gather Configuration Information
You need to gather/decide information about your environment to aid installation Trafodion for the Trafodion Installer. (Listed in alphabetical order to make it easier to find information when referenced in the install and upgrade instructions.)
| ID | Information | Default | Notes |
|---|---|---|---|
admin_principal |
Kerberos admin principal to manage principals and keytabs |
None |
Required if Kerberos is enabled. |
cluster_no |
Cluster number if multiple clusters managed in ClouderaManager |
1 |
Not required in Hortonworks distro |
dcs_cnt_per_node |
Number of concurrent client sessions per node. |
4 |
This number specifies the concurrent sessions per node to be supported. Each session could require up to 1GB of physical memory. The number can be changed post-installation. For more information, refer to the Trafodion Client Installation Guide. |
dcs_ha |
Whether to run DCS in high-availability (HA) mode. |
N |
If Y, you need to provide below dcs configurations. |
db_admin_user |
LDAP name used to connect as database admin user |
admin |
Required when LDAP is enabled. |
db_root_user |
LDAP name used to connect as database root user |
trafodion |
Required when LDAP is enabled. |
dcs_backup_nodes |
List of nodes where to start the backup DCS Master components. |
None |
Required when LDAP is enabled. Comma separated FQDN list. |
dcs_floating_ip |
IP address if running DCS in HA mode. |
None |
Required when LDAP is enabled. An FQDN name or IP address. |
dcs_interface |
Interface type used for dcs_floating_ip. |
None |
Required when LDAP is enabled. For example, eth0. |
home_dir |
Root directory under which the |
/home |
Example |
java_home |
Location of Java 1.7.0_65 or higher (JDK). |
auto detected |
Fully qualified path of the JDK. For example: |
kdcadmin_pwd1 |
Password for kerberos admin principal |
None |
Should be removed from configuration file or secured after install. |
kdc_server1 |
Location of host where Kerberos server exists |
None |
Required if Kerberos enabled. |
ldap_security1 |
Whether to enable simple LDAP authentication. |
N |
If Y, then you need to provide below ldap configurations. |
ldap_encrypt1 |
LDAP Encryption Level. |
0 |
0: Encryption not used, 1: SSL, 2: TLS |
ldap_certpath 1 |
Full path to TLS certificate. |
None |
Required if ldap_encrypt = 1 or 2. |
ldap_hosts1 |
List of nodes where LDAP Identity Store servers are running. |
None |
Comma separated. FQDN format. |
ldap_identifiers1 |
List of LDAP unique identifiers. |
None |
Comma separated. |
ldap_port1 |
Port used to communicate with LDAP Identity Store. |
None |
Examples: 389 for no encryption or TLS, 636 for SSL. |
ldap_userinfo |
Whether to use LDAP Search user name. |
N |
If Y, then you need to provide ldap_user and ldap_pwd. |
ladp_user1 |
LDAP Search user name. |
None |
Required if you need additional LDAP functionally such as LDAPSearch. If so, must provide ldap_pwd too. |
ladp_pwd1 |
Password for ldap_user. |
None |
If ldap_userinfo is required. |
local_repo_dir |
folder location of Trafodion local repository |
None |
Required if offline_mode = Y. A local folder with all trafodion rpm dependencies and repodata. For example: |
mgr_url |
FQDN and port for the Distribution Manager’s REST API. |
None |
Include |
mgr_user |
Administrator user name for Apache Ambari or Cloudera Manager. |
admin |
A user that can change configuration and restart services via the distribution manager’s REST API. |
mgr_pwd |
Administrator password for Apache Ambari or Cloudera Manager. |
admin |
A user that can change configuration and restart services via the distribution manager’s REST API. |
offline_mode |
Whether to install Trafodion without internet connection. |
N |
If Y, then you need to provide local directory in local_repo_dir |
scratch_locs |
Overflow scratch files location for large queries that cannot fit in memory. |
$TRAF_VAR |
Comma seperated if more than one folder, it should be set in a large disk |
traf_dirname |
Target folder name for the Trafodion software. |
apache-trafodion-{version} |
Trafodion is installed in this directory under |
traf_package |
The location of the Trafodion server package tar file. |
auto detected in installer folder |
The package file contains the Trafodion server, DCS, and REST software |
traf_pwd |
The password used for the Trafodion runtime user ID. |
traf123 |
Must be 6-8 characters long. |
traf_start |
Whether to start Trafodion after install/upgrade. |
Y |
traf_user |
-
Refer to Enable Security for more information about these security settings.
5.8. Install Required Software Packages
5.8.1. Download and Install Packages
This step is required if you’re:
-
Installing Trafodion on SUSE.
-
Can’t download the required software packages using the Internet.
If none of these situations exist, then we highly recommend that you use the Trafodion Installer.
You perform this step as a user with root or sudo access.
Install the packages listed in Software Packages above on all nodes in the cluster.
5.9. Download Trafodion Binaries
You download the Trafodion binaries from the Trafodion Download page. Download the following packages:
Command-line Installation
-
Trafodion Installer
-
Trafodion Server tar file
Ambari Installation
-
Trafodion Ambari RPM
-
Trafodion Server RPM
| You can download and install the Trafodion Clients once you’ve installed and activated Trafodion. Refer to the Trafodion Client Install Guide for instructions. |
6. Install with Ambari
This method of installation uses RPM packages rather than tar files. There are two packages:
-
traf_ambari - Ambari management pack (plug-in) that is installed on the Ambari Server node
-
apache-trafodion_server - Trafodion package that is installed on every data node
You can either set up a local yum repository (requires a web server) or install the RPMs manually on each node.
6.1. Local Repository
On your web server host, be sure the createrepo package is installed. Copy the two RPM files into a directory served to the web and run the createrepo command.
$ createrepo -d .
The command must be used to update repo meta-data any time new RPMs are added or replaced.
Note the Trafodion repository URL for later use.
6.2. Install Ambari Management Pack for Trafodion
On your Ambari server host:
-
If Ambari Server is not already installed, be sure to download a yum repo file for Ambari. For example: Ambari-2.4.2 repo.
-
Add a yum repo file with the URL of your local repository, or copy the traf_ambari RPM locally.
-
Install the Trafodion Ambari management pack RPM. Ambari server will be installed as a dependency, if not already installed.
$ sudo yum install traf_ambari
-
Set-up Ambari
-
If Ambari server was previously running, restart it.
$ sudo ambari-server restart
-
If Ambari server was not previously running, initialize and start it.
$ sudo ambari-server setup
...
$ sudo ambari-server start
-
6.3. Install Trafodion
Unlike the command-line installer, Trafodion can be provisioned at time of creating a new cluster.
6.3.1. Initial Cluster Creation
If you are creating a new cluster and you have the Trafodion server RPM hosted on a local yum repository, then create the cluster as normal, and select a stack version that includs the Trafodion service.
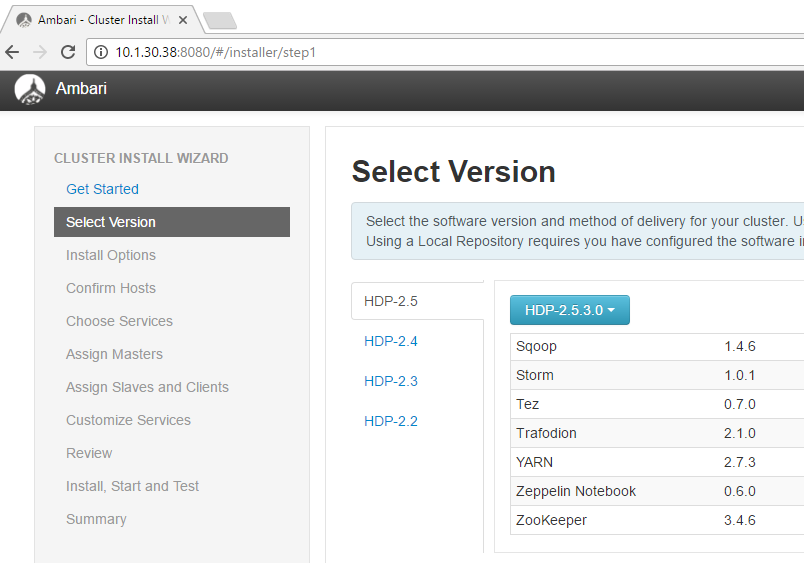
When selecting HDP stack version, Ambari prompts for the repository URLs, be sure to update the Trafodion URL to the URL for your local repository.

If you plan to install the server RPM manually, set the Trafodion URL to some other valid repository, otherwise the the invalid URL will cause errors later. Any valid repo URL will do. You may copy the HDP URL and paste it into the Trafodion URL. In this case, do not select the Trafodion service on the "Choose Services" step. First, create a cluster without the Trafodion service and follow instructions below for an existing cluster.
6.3.2. Existing Cluster
If you are not using a local yum repository, manually copy the apache-trafodion_server RPM to each data node and install it using yum install.
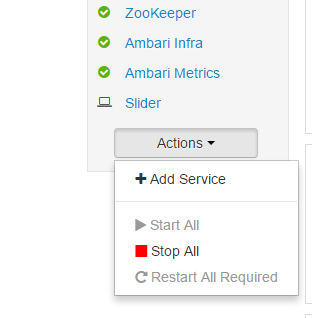
Using Ambari, select the cluster and then from the Actions menu choose "Add Service" and select Trafodion.
| You may get a configuration warning regarding a hbase-site setting. In this case, follow the warning message instructions to go back to the HBase advanced configuration, hbase-site section and use the button to revert to the recommended value for "hbase.coprocessor.region.classes". |
Several services will need to be restarted before the Trafodion service can be started. Choose cluster "Actions" menu option "Restart All Required".
6.4. Initialize Meta-Data
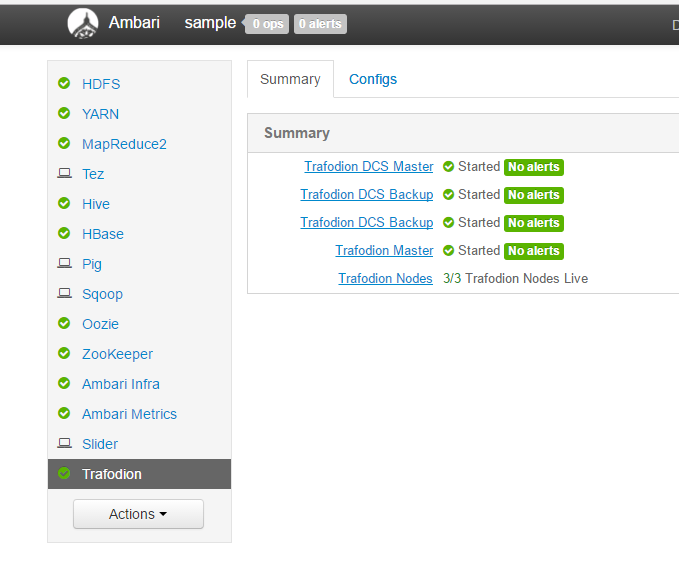
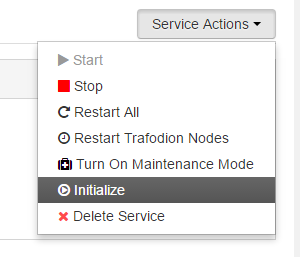
After Trafodion is installed and started, it must be initialized before use. Select the Trafodion service and then from the Service Actions menu choose "Initialize" and confirm the action.
6.5. Upgrade from Prior Version
First, be sure to stop the trafodion service prior to upgrading.
Upgrade the traf_ambari package and re-start ambari-server service.
$ sudo ambari-server restart
6.5.1. Upgrade Entire HDP Stack
Ambari requires version upgrades to be an entire stack, not single components. If you want to include a trafodion upgrade in entire stack version upgrade, first upgrade the traf_ambari package and restart Ambari server.
Once that is done, proceed with the upgrade following Ambari instructions. Be sure to define the Trafodion-2.2 URL that points to a repo server with the new apache-trafodion_server package.
6.5.2. Upgrade Only Trafodion
In this case, Ambari will not upgrade a single component, so the apache-trafodion_server package must be installed on each node directly (via yum command). Once that is done, the service can be started as usual.
7. Install
This chapter describes how to use the Trafodion Installer to install Trafodion. You use the Trafodion Provisioning ID to run the Trafodion Installer.
7.1. Unpack Installer
You should already have downloaded the Trafodion Binaries per the instructions in the Download Trafodion Binaries in the Prepare chapter. If not, please do so now.
The first step in the installation process is to unpack the Trafodion Installer tar file.
Example
$ mkdir $HOME/trafodion-installer
$ cd $HOME/trafodion-downloads
$ tar -zxf apache-trafodion_pyinstaller-x.x.x.tar.gz -C $HOME/trafodion-installer
$
7.2. Guided Install
The Trafodion Installer prompts you for the information you collected in the Gather Configuration Information step in the Prepare chapter.
The following example shows a guided install of Trafodion on a two-node Cloudera Hadoop cluster that does not have Kerberos nor LDAP installed.
Example
-
Run the Trafodion Installer in guided mode.
$ cd $HOME/trafodion-installer/python-installer $ ./db_install.py ********************************** Trafodion Installation ToolKit ********************************** Enter HDP/CDH web manager URL:port, (full URL, if no http/https prefix, default prefix is http://): 192.168.0.31:7180 Enter HDP/CDH web manager user name [admin]: Enter HDP/CDH web manager user password: Confirm Enter HDP/CDH web manager user password: TASK: Environment Discover *************************************************************** Time Cost: 0 hour(s) 0 minute(s) 4 second(s) Enter full path to Trafodion tar file [/data/python-installer/apache-trafodion_server-x.x.x-RH-x86_64.tar.gz]: Enter directory name to install trafodion to [apache-trafodion-x.x.x]: Enter trafodion user password: Confirm Enter trafodion user password: Enter number of DCS client connections per node [4]: Enter trafodion scratch file folder location(should be a large disk), if more than one folder, use comma seperated [$TRAF_VAR]: Start instance after installation (Y/N) [Y]: Enable LDAP security (Y/N) [N]: Enable DCS High Avalability (Y/N) [N]: ***************** Final Configs ***************** +------------------+-----------------------------------------------------------------------------------+ | config type | value | +------------------+-----------------------------------------------------------------------------------+ | dcs_cnt_per_node | 4 | | dcs_ha | N | | first_rsnode | node-1 | | hbase_user | hbase | | hdfs_user | hdfs | | home_dir | /home | | java_home | /usr/lib/jvm/java-1.7.0-openjdk.x86_64 | | ldap_security | N | | mgr_url | http://192.168.0.31:7180 | | mgr_user | admin | | node_list | node-1,node-2 | | scratch_locs | $TRAF_VAR | | traf_dirname | apache-trafodion-x.x.x | | traf_package | /data/python-installer/apache-trafodion_server-x.x.x-RH-x86_64.tar.gz | | traf_start | Y | | traf_user | trafodion | +------------------+-----------------------------------------------------------------------------------+ Confirm result (Y/N) [N]: y ** Generating config file to save configs ... ********************** Installation Start ********************** TASK: Environment Check ****************************************************************** Host [node-2]: Script [traf_check.py] .......................................... [ OK ] Host [node-1]: Script [traf_check.py] .......................................... [ OK ] TASK: Copy Trafodion package file ******************************************************** Script [copy_files.py] ......................................................... [ OK ] TASK: Trafodion user Setup *************************************************************** Host [node-2]: Script [traf_user.py] ........................................... [ OK ] Host [node-1]: Script [traf_user.py] ........................................... [ OK ] TASK: Install Trafodion dependencies ***************************************************** Host [node-2]: Script [traf_dep.py] ............................................ [ OK ] Host [node-1]: Script [traf_dep.py] ............................................ [ OK ] TASK: Install Trafodion package ********************************************************** Host [node-2]: Script [traf_package.py] ........................................ [ OK ] Host [node-1]: Script [traf_package.py] ........................................ [ OK ] TASK: Environment Setup ****************************************************************** Host [node-1]: Script [traf_setup.py] .......................................... [ OK ] Host [node-2]: Script [traf_setup.py] .......................................... [ OK ] TASK: DCS/REST Setup ********************************************************************* Host [node-2]: Script [dcs_setup.py] ........................................... [ OK ] Host [node-1]: Script [dcs_setup.py] ........................................... [ OK ] TASK: Hadoop modification and restart **************************************************** ***[INFO]: Restarting CDH services ... Check CDH services restart status (timeout: 600 secs) ................. ***[OK]: CDH services restart successfully! ***[INFO]: Deploying CDH client configs ... Check CDH services deploy status (timeout: 300 secs) .. ***[OK]: CDH services deploy successfully! Script [hadoop_mods.py] ......................................................... [ OK ] TASK: Set permission of HDFS folder for Trafodion user *********************************** Host [node-1]: Script [hdfs_cmds.py] ............................................ [ OK ] TASK: Sqconfig Setup ********************************************************************* Host [node-1]: Script [traf_sqconfig.py] ........................................ [ OK ] TASK: Start Trafodion ******************************************************************** Host [node-1]: Script [traf_start.py] ........................................... [ OK ] Time Cost: 0 hour(s) 7 minute(s) 45 second(s) ************************* Installation Complete ************************* -
Switch to the Trafodion Runtime User and check the status of Trafodion.
$ sudo su - trafodion
$ sqcheck
*** Checking Trafodion Environment ***

Checking if processes are up.
Checking attempt: 1; user specified max: 2. Execution time in seconds: 0.

The SQ environment is up!

Process         Configured      Actual      Down
-------         ----------      ------      ----
DTM             2               2
RMS             4               4
DcsMaster       1               1
DcsServer       2               2
mxosrvr         8               8
RestServer      1               1
$
Trafodion is now running on your Hadoop cluster. Please refer to the Activate chapter for basic instructions on how to verify the Trafodion management and how to perform basic management operations.
7.3. Automated Install
The --config-file option runs the Trafodion in Automated Setup mode. Refer to Trafodion Installer
in the Introduction chapter for instructions of how you edit your configuration file.
Edit your config file using the information you collected in the Gather Configuration Information step in the Prepare chapter.
The following example shows an automated install of Trafodion on a two-node Hortonworks Hadoop cluster that does not have Kerberos nor LDAP enabled.
Example
-
Run the Trafodion Installer in Automated Setup mode.
$ cd $HOME/trafodion-installer/python-installer $ ./db_install.py --config-file my_config --silent ********************************** Trafodion Installation ToolKit ********************************** ** Loading configs from config file ... TASK: Environment Discover *************************************************************** Time Cost: 0 hour(s) 0 minute(s) 4 second(s) ********************** Installation Start ********************** TASK: Environment Check ****************************************************************** Host [node-2]: Script [traf_check.py] .......................................... [ OK ] Host [node-1]: Script [traf_check.py] .......................................... [ OK ] TASK: Copy Trafodion package file ******************************************************** Script [copy_files.py] ......................................................... [ OK ] TASK: Trafodion user Setup *************************************************************** Host [node-2]: Script [traf_user.py] ........................................... [ OK ] Host [node-1]: Script [traf_user.py] ........................................... [ OK ] TASK: Install Trafodion dependencies ***************************************************** Host [node-2]: Script [traf_dep.py] ............................................ [ OK ] Host [node-1]: Script [traf_dep.py] ............................................ [ OK ] TASK: Install Trafodion package ********************************************************** Host [node-2]: Script [traf_package.py] ........................................ [ OK ] Host [node-1]: Script [traf_package.py] ........................................ [ OK ] TASK: Environment Setup ****************************************************************** Host [node-1]: Script [traf_setup.py] .......................................... [ OK ] Host [node-2]: Script [traf_setup.py] .......................................... [ OK ] TASK: DCS/REST Setup ********************************************************************* Host [node-2]: Script [dcs_setup.py] ........................................... [ OK ] Host [node-1]: Script [dcs_setup.py] ........................................... [ OK ] TASK: Hadoop modification and restart **************************************************** ***[INFO]: Restarting CDH services ... Check CDH services restart status (timeout: 600 secs) ................. ***[OK]: CDH services restart successfully! ***[INFO]: Deploying CDH client configs ... Check CDH services deploy status (timeout: 300 secs) .. ***[OK]: CDH services deploy successfully! Script [hadoop_mods.py] ......................................................... [ OK ] TASK: Set permission of HDFS folder for Trafodion user *********************************** Host [node-1]: Script [hdfs_cmds.py] ............................................ [ OK ] TASK: Sqconfig Setup ********************************************************************* Host [node-1]: Script [traf_sqconfig.py] ........................................ [ OK ] TASK: Start Trafodion ******************************************************************** Host [node-1]: Script [traf_start.py] ........................................... [ OK ] Time Cost: 0 hour(s) 7 minute(s) 45 second(s) ************************* Installation Complete ************************* -
Switch to the Trafodion Runtime User and check the status of Trafodion.
$ sudo su - trafodion
$ sqcheck
*** Checking Trafodion Environment ***

Checking if processes are up.
Checking attempt: 1; user specified max: 2. Execution time in seconds: 0.

The SQ environment is up!

Process         Configured      Actual      Down
-------         ----------      ------      ----
DTM             2               2
RMS             4               4
DcsMaster       1               1
DcsServer       2               2
mxosrvr         8               8
RestServer      1               1
$
Trafodion is now running on your Hadoop cluster. Please refer to the Activate chapter for basic instructions on how to verify the Trafodion management and how to perform basic management operations.
8. Upgrade
This chapter describes how to use the Trafodion Installer to upgrade Trafodion. You use the Trafodion Provisioning ID to run the Trafodion Installer.
8.1. Download Updated Trafodion Binaries
You perform this step as the Trafodion Provisioning User.
You download the updated Trafodion binaries from the Trafodion Download page. Download the following packages:
-
Trafodion Installer (if planning to use the Trafodion Installer)
-
Trafodion Server
Refer to Download Trafodion Binaries in the Prepare chapter for examples.
8.2. Unpack Installer
You perform this step as the Trafodion Provisioning User.
You unpack the updated Trafodion Installer into a new directory.
Example
$ mkdir $HOME/trafodion-installer
$ cd $HOME/trafodion-downloads
$ tar -zxf apache-trafodion-pyinstaller-2.2.0.tar.gz -C $HOME/trafodion-installer
$
8.3. Stop Trafodion
You perform this step as the Trafodion Runtime User.
Example
$ sudo su trafodion
$ sqstop
Shutting down the REST environment now
stopping rest.
Shutting down the DCS environment now
stopping master.
trafodion-1: stopping server.
trafodion-2: stopping server.
stopped $zlobsrv0
stopped $zlobsrv1
Shutting down (normal) the SQ environment!
Wed Feb 17 05:12:40 UTC 2016
Processing cluster.conf on local host trafodion-1
[$Z000KAE] Shell/shell Version 1.0.1 Apache_Trafodion Release 1.3.0 (Build release [1.3.0-0-g5af956f_Bld2], date 20160112_1927)
[$Z000KAE] %ps
[$Z000KAE] NID,PID(os)  PRI TYPE STATES  NAME        PARENT      PROGRAM
[$Z000KAE] ------------ --- ---- ------- ----------- ----------- ---------------
[$Z000KAE] 000,00064198 000 WDG  ES--A-- $WDG000     NONE        sqwatchdog
[$Z000KAE] 000,00064199 000 PSD  ES--A-- $PSD000     NONE        pstartd
[$Z000KAE] 000,00064212 001 GEN  ES--A-- $TSID0      NONE        idtmsrv
[$Z000KAE] 000,00064242 001 DTM  ES--A-- $TM0        NONE        tm
[$Z000KAE] 000,00065278 001 GEN  ES--A-- $ZSC000     NONE        mxsscp
[$Z000KAE] 000,00065305 001 SSMP ES--A-- $ZSM000     NONE        mxssmp
[$Z000KAE] 000,00001219 001 GEN  ES--A-- $Z0000ZU    NONE        mxosrvr
[$Z000KAE] 000,00001235 001 GEN  ES--A-- $Z00010A    NONE        mxosrvr
[$Z000KAE] 000,00001279 001 GEN  ES--A-- $Z00011J    NONE        mxosrvr
[$Z000KAE] 000,00001446 001 GEN  ES--A-- $Z00016B    NONE        mxosrvr
[$Z000KAE] 000,00024864 001 GEN  ES--A-- $Z000KAE    NONE        shell
[$Z000KAE] 001,00025180 000 PSD  ES--A-- $PSD001     NONE        pstartd
[$Z000KAE] 001,00025179 000 WDG  ES--A-- $WDG001     NONE        sqwatchdog
[$Z000KAE] 001,00025234 001 DTM  ES--A-- $TM1        NONE        tm
[$Z000KAE] 001,00025793 001 GEN  ES--A-- $ZSC001     NONE        mxsscp
[$Z000KAE] 001,00025797 001 SSMP ES--A-- $ZSM001     NONE        mxssmp
[$Z000KAE] 001,00026587 001 GEN  ES--A-- $Z010LPM    NONE        mxosrvr
[$Z000KAE] 001,00026617 001 GEN  ES--A-- $Z010LQH    NONE        mxosrvr
[$Z000KAE] 001,00026643 001 GEN  ES--A-- $Z010LR8    NONE        mxosrvr
[$Z000KAE] 001,00026644 001 GEN  ES--A-- $Z010LR9    NONE        mxosrvr
shutdown
[$Z000KAE] %shutdown
exit
Issued a 'shutdown normal' request

Shutdown in progress

# of SQ processes: 0
SQ Shutdown (normal) from /home/trafodion Successful
Wed Feb 17 05:12:47 UTC 2016
$
8.4. Guided Upgrade
You perform this step as the Trafodion Provisioning User.
As in the case with an installation, the Trafodion Installer prompts you for the information you collected in the Gather Configuration Information step in the Prepare chapter.
From user’s perspective, guided upgrade doesn’t require the Trafodion runtime user’s password. The rest of things have no difference with guided install. Please refer to Guided Install for the example of installing Trafodion on a two-node Cloudera Hadoop cluster.
8.5. Automated Upgrade
You perform this step as the Trafodion Provisioning User.
The --config-file option runs the Trafodion in Automated Setup mode. Refer to Trafodion Installer
in the Introduction chapter for instructions of how you edit your configuration file.
At a minimum, you need to change the following settings:
-
traf_package
Example
$ cd $HOME/trafodion-configuration
$ cp my_config my_config_2.0
$ # Pre edit content

traf_package = "/home/centos/trafodion-download/apache-trafodion-2.2.0.tar.gz"

$ # Use your favorite editor to modify my_config_2.0
$ emacs my_config_2.0
$ # Post edit changes

traf_package = "/home/centos/trafodion-download/apache-trafodion-2.2.0.tar.gz"| The Trafodion Installer performs the same configuration changes as it does for an installation, including restarting Hadoop services. |
Please refer to Automated Install for the example of installing Trafodion on a two-node Cloudera Hadoop cluster.
9. Activate
9.1. Manage Trafodion
You use the Trafodion runtime user ID to perform Trafodion management operations.
The following table provides an overview of the different Trafodion management scripts.
| Component | Start | Stop | Status |
|---|---|---|---|
All of Trafodion |
sqstart |
sqstop |
sqcheck |
RMS Server |
rmsstart |
rmsstop |
rmscheck |
REST Server |
reststart |
reststop |
- |
LOB Server |
lobstart |
lobstop |
- |
DCS (Database Connectivity Services) |
dcsstart |
dcsstop |
dcscheck |
Example: Start Trafodion
cd $TRAF_HOME/sql/scripts
sqstart
sqcheck
9.2. Validate Trafodion Installation
You can use sqlci (part of the base product) or trafci (requires separate install; see the Trafodion Client Installation Guide) to validate your installation.
9.2.1. Smoke Test
A simple smoke test to validate that Trafodion is functioning.
get schemas;
create table table1 (a int);
invoke table1;
insert into table1 values (1), (2), (3), (4);
select * from table1;
drop table table1;
exit;
Example
$ sqlci
Apache Trafodion Conversational Interface 1.3.0
Copyright (c) 2015 Apache Software Foundation
>>get schemas;

Schemas in Catalog TRAFODION
============================

SEABASE
_MD_
_LIBMGR_
_REPOS_

--- SQL operation complete.
>>create table table1 (a int);

--- SQL operation complete.
>>invoke table1;

-- Definition of Trafodion table TRAFODION.SEABASE.TABLE1
-- Definition current  Mon Feb 15 07:42:02 2016

  (
    SYSKEY                           LARGEINT NO DEFAULT NOT NULL NOT DROPPABLE
      NOT SERIALIZED
  , A                                INT DEFAULT NULL SERIALIZED
  )

--- SQL operation complete.
>>insert into table1 values (1), (2), (3), (4);

--- 4 row(s) inserted.
>>select * from table1;

A
-----------

          1
          2
          3
          4

--- 4 row(s) selected.
>>drop table table1;

--- SQL operation complete.
>>exit;
$
Assuming no errors, your installation has been successful. Next, do the following:
-
Install the Trafodion client software. Refer to the Trafodion Client Installation Guide.
-
Use Trafodion. Refer to the Trafodion SQL Reference Manual.
-
Review other Trafodion documentation. Refer to the Trafodion documentation.
9.3. Troubleshooting Tips
If you are not able to start up the environment or if there are problems running sqlci or trafci, then verify that the all the processes are up and running.
-
sqcheckshould indicate all processes are running.
If processes are not running as expected, then:
-
sqstopto shut down Trafodion. If some Trafodion processes do not terminate cleanly, then runckillall. -
sqstartto restart Trafodion.
If problems persist please review logs:
-
$TRAF_HOME/logs: Trafodion logs.
10. Remove
You use the Trafodion Provisioning User for these instructions.
You do not need to use the db_uninstall.py script before upgrading Trafodion. Instead, use the db_install.py script,
which automatically upgrades the version of Trafodion. Please refer to the Install chapter for further instructions.
|
Run the commands from the first node of the cluster. You can also run it from any node, but you need to specifiy the hostnames of Trafodion cluster.
10.1. Stop Trafodion
Do the following:
su trafodion
cd $TRAF_HOME/sql/scripts or cds
sqstop
exit
Example
[admin@trafodion-1 ~]$ su trafodion
[trafodion@trafodion-1 scripts]$ cds
[trafodion@trafodion-1 scripts]$ sqstop
Shutting down the REST environment now
stopping rest.
Shutting down the DCS environment now
stopping master.
trafodion-1: stopping server.
trafodion-2: stopping server.
stopped $zlobsrv0
stopped $zlobsrv1
Shutting down (normal) the SQ environment!
Mon Feb 15 07:49:18 UTC 2016
Processing cluster.conf on local host trafodion-1
.
.
.

[$Z000HDS] 001,00024772 001 GEN  ES--A-- $Z010K7S    NONE        mxosrvr
[$Z000HDS] 001,00024782 001 GEN  ES--U-- $ZLOBSRV1   NONE        mxlobsrvr
shutdown
[$Z000HDS] %shutdown
exit
Issued a 'shutdown normal' request

Shutdown in progress

# of SQ processes: 0
SQ Shutdown (normal) from /home/trafodion/apache-trafodion-2.2.0-bin/sql/scripts Successful
Mon Feb 15 07:49:26 UTC 2016
[trafodion@trafodion-1 scripts]$ exit
[admin@trafodion-1 ~]$
10.2. Run db_uninstall.py
The db_uninstall.py completely removes Trafodion, includes Trafodion user’s home directory.
Example
[admin@trafodion-1 ~]$ cd $HOME/trafodion-installer/python-installer
[admin@trafodion-1 installer]$ ./db_uninstall.py
*****************************
  Trafodion Uninstall Start
*****************************
Uninstall Trafodion on [node-1 node-2] [N]: y

***[INFO]: Remove Trafodion on node [node-1] ...

***[INFO]: Remove Trafodion on node [node-2] ...
*********************************
  Trafodion Uninstall Completed
*********************************
[admin@trafodion-1 installer]$
11. Enable Security
Trafodion supports user authentication with LDAP, integrates with Hadoop’s Kerberos environment and supports authorization through database grant and revoke requests (privileges).
If this is an initial installation, both LDAP and Kerberos can be configured by running the Trafodion installer. If Trafodion is already installed, then both LDAP and Kerberos can be configured by running the Trafodion security installer.
-
If Hadoop has enabled Kerberos, then Trafodion must also enable Kerberos.
-
If Kerberos is enabled, then LDAP must be enabled.
-
If LDAP is enabled, then database authorization (privilege support) is automatically enabled.
-
If Kerberos is not enabled, then enabling LDAP is optional.
11.1. Configuring Trafodion for Kerberos
Kerberos is a protocol for authenticating a request for a service or operation. It uses the notion of a ticket to verify accessibility. The ticket is proof of identity encrypted with a secret key for the particular requested service. Tickets exist for a short time and then expire. Therefore, you can use the service as long as your ticket is valid (i.e. not expired). Hadoop uses Kerberos to provide security for its services, as such Trafodion needs to function properly with Hadoop that have Kerberos enabled.
11.1.1. Kerberos configuration file
It is assumed that Kerberos has already been set up on all the nodes by the time Trafodion is installed. This section briefly discusses the Kerberos configuration file for reference.
The Kerberos configuration file defaults to /etc/krb5.conf and contains, among other attributes:
* log location: location where Kerberos errors and other information are logged
* KDC location: host location where the KDC (Key Distribution Center) is located
* admin server location: host location where the Kerberos admin server is located
* realm: the set of nodes that share a Kerberos database
* ticket defaults: contains defaults for ticket lifetimes, encoding, and other attributes
You need to have access to a Kerberos administrator account to enable Kerberos for Trafodion. The following is an example request that lists principals defined in the Kerberos database that can be used to test connectivity:
kadmin -p 'kdcadmin/admin' -w 'kdcadmin123' -s 'kdc.server' -q 'listprincs'
* -p (principal): please replace 'kdcadmin/admin' with your admin principal
* -w (password): please replace 'kdadmin123' with the password for the admin principal
* -s (server location): please replace 'kdc.server' with your KDC admin server location
* -q (command): defines the command to run, in this case principals are returned
11.1.2. Ticket Management
When Kerberos is enabled in Trafodion, the security installation process:
-
Adds a Trafodion principal in Kerberos, one per node with the name trafodion/hostname@realm.
-
Creates a keytab for each principal and distributes the keytab to each node. The keytab name is the same for all nodes and defaults to a value based on the distribution, for example: etc/trafodion/keytabs/trafodion.service.keytab.
-
Performs a "kinit" on all nodes in the cluster for the
trafodionuser. -
Adds commands to perform "kinit" and to start the ticket renewal procedure to the
trafodion.bashrc scripts on each node.
The ticket renewal service renews tickets up until the maximum number of renewals allowed. So if your ticket lifetime is
one day and the number of renewals is seven days, the ticket renewal service automatically renews tickets six times. Once
the ticket expires, it must be initialized again to continue running Trafodion. Connecting to each node as the trafodion
user initializes the ticket if one does not exist.
TBD - A future update will include details on how tickets can be managed at the cluster level.
11.1.3. Kerberos installation
The Trafodion installation scripts automatically determine if Kerberos is enabled on the node. If it is enabled, then the environment variable SECURE_HADOOP is set to "Y".
The following are questions that will be asked related to Kerberos:
-
Enter KDC server address, default is []: – no default
-
Enter admin principal (include realm), default is []: - no default
-
Enter password for admin principal:
KDC admin password will be saved only in configuration file db_config.bakYYMMDD_HHMM in installer folder when installation completed.
You can delete this file for secure perspective.
NOTE: Keytab files are auto detected by installer in CDH/HDP cluster.
NOTE: Installer doesn’t support kerberos enabled Apache Hadoop for this release.
|
11.2. Configuring LDAP
Trafodion does not manage user names and passwords internally but supports authentication via directory servers using the OpenLDAP protocol, also known as LDAP servers. You can configure the LDAP servers during installation by answering the Trafodion Installer’s prompts. To configure LDAP after installation run the Trafodion security installer directly. Installing LDAP also enables database authorization (privilege support).
Once authentication and authorization are enabled, Trafodion allows users to be registered in the database and allows privileges on objects to be granted to users and roles (which are granted to users). Trafodion also supports component-level (or system-level) privileges, such as MANAGE_USERS, which can be granted to users and roles. Refer to Manage Users below.
If you do not enable LDAP in Trafodion, then a client interface to Trafodion may request a user name and password,
but Trafodion ignores the user name and password entered in the client interface, and the session runs as the database root user,
DB__ROOT, without restrictions. If you want to restrict users, restrict access to certain users only, or restrict access to an
object or operation, then you must enable security, which enforces authentication and authorization.
|
11.2.1. Configuring LDAP Servers
To specify the LDAP server(s) to be used for authentication, you need to configure the text file .traf_authentication_config,
located (by default) in $TRAF_HOME/sql/scripts. This file is a flat file, organized as a series of attribute/value pairs.
Details on all the attributes and values accepted in the authentication configuration file and how to configure alternate locations
can be found in .traf_authentication_config below.
A sample template file is located in $TRAF_HOME/sql/scripts/traf_authentication_config.
Attributes and values in the authentication configuration file are separated with a colon immediately following the attribute name. In general, white space is ignored but spaces may be relevant in some values. Attribute names are always case insensitive. Multiple instances of an attribute are specified by repeating the attribute name and providing the new value. For attributes with only one instance, if the attribute is repeated, the last value provided is used.
Attribute1: valueA
Attribute2: valueB
Attribute1: valueC
If Attribute1 has only one instance, valueC is used, otherwise, valueA and valueC are both added to the list of values for Attribute1.
Attributes are grouped into sections; this is for future enhancements. Attributes are declared in the LOCAL section, unless otherwise specified.
| Section names, attribute names, and the general layout of the authentication configuration file are subject to change in future versions of Trafodion and backward compatibility is not guaranteed. |
Specification of your directory server(s) requires at a minimum:
| Setting | Description | Example |
|---|---|---|
LDAP Host Name(s) |
One or more names of hosts that support the OpenLDAP protocol must be specified. Trafodion attempts to connect to all
provided host names during the authentication process. The set of user names and passwords should be identical on all hosts to avoid unpredictable
results. The attribute name is |
|
LDAP Port Number |
Port number of the LDAP server. Typically this is 389 for servers using no encryption or TLS, and 636 for servers using SSL.
The attribute name is |
|
LDAP Unique Identifier |
Attribute(s) used by the directory server that uniquely identifies the user name. You may provide one or more unique identifier specifiers. |
|
Encryption Level |
A numeric value indicating the encryption scheme used by your LDAP server. Values are: |
|
Search username and password |
Some LDAP servers require a known user name and password to search the directory of user names. If your environment has that requirement, provide these "search" values. |
|
There are additional optional attributes that can be used to customize Trafodion authentication. As mentioned earlier, they are described in .traf_authentication_config below.
You can test the authentication configuration file for syntactic errors using the ldapconfigcheck tool. If you have loaded the Trafodion
environment (sqenv.sh), then the tool automatically checks the file at $TRAF_HOME/sql/scripts/.traf_authentication_config.
If not, you can specify the file to be checked.
Example
ldapconfigcheck -file myconfigfile
File myconfigfile is valid.
If an error is found, then the line number with the error is displayed along with the error. Please refer to ldapconfigcheck below for more information.
| The authentication configuration file needs to be propagated to all nodes, but there is a script that does that for you described later. For now, you can test your changes on the local node. |
You can test the LDAP connection using the utility ldapcheck. To use this utility the Trafodion environment must be loaded (sqenv.sh),
but the Trafodion instance does not need to be running. To test the connection only, you can specify any user name, and a name lookup is performed
using the attributes in .traf_authentication_config.
ldapcheck --username=fakename@company.com
User fakename@company.com not found
If ldapcheck reports either that the user was found or the user was not found, the connection was successful. However, if an error is reported,
either the configuration file is not setup correctly, or there is a problem either with your LDAP server or the connection to the server. You can
get additional error detail by including the --verbose option. Please refer to ldapcheck for more information.
If you supply a password, ldapcheck attempts to authenticate the specified username and password. The example below shows the password
for illustrative purposes, but to avoid typing the password on the command line, leave the password blank (--password=) and the utility
prompts for the password with no echo.
ldapcheck --username=realuser@company.com --password=StrongPassword
Authentication successful
11.2.2. Generate Trafodion Certificate
Trafodion clients such as trafci encrypt the password before sending it to Trafodion. A self-signed certificate is used to encrypt the password.
The certificate and key are generated when the sqgen script is invoked. By default, the files server.key and server.crt are located
in $HOME/sqcert. If those files are not present and since Trafodion clients does not send unencrypted passwords, then you need to manually generate
those files. To do so, run the script sqcertgen located in $TRAF_HOME/sql/scripts. The script runs openssl to generate the certificate and key.
To run openssl manually, follow the example:
openssl req -x509 -nodes -days 365 -subj '/C=US/ST=California/L=PaloAlto/CN=host.domain.com/O=Some Company/OU=Service Connection'
- newkey rsa:2048 -keyout server.key -out server.crt| Option | Description |
|---|---|
-x509 |
Generate a self-signed certificate. |
-days <validity of certificate> |
Make the certificate valid for the days specified. |
-newkey rsa:<bytes> |
Generate a new private key of type RSA of length 1024 or 2048 bytes. |
-subj <certificateinfo> |
Specify the information that is incorporated in the certificate.
Each instance in a cluster should have a unique common name( |
-keyout <filename> |
Write the newly generated RSA private key to the file specified. |
-nodes |
It is an optional parameter that specifies NOT to encrypt the private key. If you encrypt the private key, then you must enter the password every time the private key is used by an application. |
-out <filename> |
Write the self-signed certificate to the specified file. |
Both the public (server.crt) and private (server.key) files should be placed in the directory $HOME/sqcert. If you do not want to use
the HOME directory or if you want to use different names for the private and/or public key files, then Trafodion supports environment variables
to specific the alternate locations or names.
-
Trafodion first checks the environment variables
SQCERT_PRIVKEYandSQCERT_PUBKEY. If they are set, Trafodion uses the fully qualified filename value of the environment variable.You can specify either one filename environment variable or both.
-
If at least one filename environment variable is not set, Trafodion checks the value of the environment variable
SQCERT_DIR. If set, then the default filenameserver.keyorserver.crtis appended to the value of the environment variableSQCERT_DIR. -
If the filename environment variable is not set and the directory environment variable is not set, then Trafodion uses the default location (
$HOME/sqcert) and the default filename.
11.2.3. Creating the LDAP configuration file
The .traf_authentication_config file is user to enable the Trafodion security features.
File Location
By default, the Trafodion authentication configuration file is located in $TRAF_HOME/sql/scripts/.traf_authentication_config.
If you want to store the configuration file in a different location and/or use a different filename, then Trafodion supports environment
variables to specify the alternate location/name.
Trafodion firsts checks the environment variable TRAFAUTH_CONFIGFILE. If set, the value is used as the fully-qualified Trafodion
authentication configuration file.
If the environment variable is not set, then Trafodion next checks the variable TRAFAUTH_CONFIGDIR. If set, the value is prepended to
.traf_authentication_config and used as the Trafodion authentication file.
If neither is set, Trafodion defaults to $TRAF_HOME/sql/scripts/.traf_authentication_config.
Template
# To use authentication in Trafodion, this file must be configured
# as described below and placed in $TRAF_HOME/sql/scripts and be named
# .traf_authentication_config.
#
# NOTE: the format of this configuration file is expected to change in the
# next release of Trafodion.  Backward compatibility is not guaranteed.
#
SECTION: Defaults
  DefaultSectionName: local
  RefreshTime: 1800
  TLS_CACERTFilename:
SECTION: local

# If one or more of the LDAPHostName values is a load balancing host, list
# the name(s) here, one name: value pair for each host.
  LoadBalanceHostName:

# One or more identically configured hosts must be specified here,
# one name: value pair for each host.
  LDAPHostName:

# Default is port 389, change if using 636 or any other port
  LDAPPort:389

# Must specify one or more unique identifiers, one name: value pair for each
  UniqueIdentifier:

# If the configured LDAP server requires a username and password to
# to perform name lookup, provide those here.
  LDAPSearchDN:
  LDAPSearchPwd:

# If configured LDAP server requires TLS(1) or SSL (2), update this value
  LDAPSSL:0

# Default timeout values in seconds
  LDAPNetworkTimeout: 30
  LDAPTimeout: 30
  LDAPTimeLimit: 30

# Default values for retry logic algorithm
  RetryCount: 5
  RetryDelay: 2
  PreserveConnection: No
  ExcludeBadHosts: Yes
  MaxExcludeListSize: 3
Configuration Attributes
| Attribute Name | Purpose | Example Value | Notes |
|---|---|---|---|
|
Host name of the local LDAP server. |
ldap.master.com |
If more than one |
|
Port number of the local LDAP server. |
345 |
Must be numeric value. Related to |
|
If a search user is needed, the search user distinguished name is specified here. |
cn=aaabbb, dc=demo, dc=net |
If anonymous search is allowed on the local server, then this attribute does not need to be specified or can be specified with no value (blank). To date, anonymous search is the normal approach used. |
|
Password for the |
welcome |
None. |
|
A numeric value specifying whether the local LDAP server interface is unencrypted or TLS or SSL. Legal values are 0 for unencrypted, 1 for SSL, and 2 for TLS. For SSL/TLS, see the section below on Encryption Support. |
0 |
None. |
|
The directory attribute that contains the user’s unique identifier. |
uid=,ou=Users,dc=demo,dc=net |
To account for the multiple forms of |
|
Specifies the timeout (in seconds) after which the next |
20 |
The value must be a positive number or -1. Setting this to -1 results in an infinite timeout. |
|
Specifies the time to wait when performing a search on the LDAP server for the user name. The number must be a positive integer.
This parameter is similar to |
15 |
The server may still apply a lower server-side limit on the duration of a search operation. |
|
Specifies a timeout (in seconds) after which calls to synchronous LDAP APIs aborts if no response is received.
This parameter is similar to |
15 |
The value must be a positive number or -1. Setting this to -1 results in an infinite timeout. |
|
Number of attempts to establish a successful LDAP connection. Default is 5 retries before returning an error. |
10 |
When a failed operation is retried, it is attempted with each configured LDAP server, until the operation is successful or the number of configured retries is exceeded. |
|
Specifies the number of seconds to delay between retries. Default value is 2 seconds. See description of |
1 |
None. |
|
Specifies whether the connection to LDAP server is maintained (YES) or closed (NO) once the operation finishes. Default value is NO. |
YES |
None. |
|
Specifies the number of seconds that must have elapsed before the configuration file is reread. Default is 1800 (30 minutes). |
3600 |
If set to zero, the configuration file is never read. The connectivity servers must be restarted for changes to take effect if this value is zero. This attribute is not specific to either configuration and must be defined in the DEFAULTS section. |
|
Specifies the location of the certificate file for the LDAP server(s). Filename can either be fully qualified or relative to |
cert.pem |
This attribute applies to both configurations. If a configuration does not require a certificate, then this attribute is ignored. This attribute must be defined in the DEFAULTS section. |
|
Specifies the configuration type that is assigned to a user by the |
LOCAL |
This attribute must be defined in the |
11.2.4. Verifying configuration and users through ldapcheck
Usage
ldapcheck  [<option>]...
<option> ::= --help|-h            display usage information
             --username=<LDAP-username>
             --password[=<password>]
             --primary            Use first configuration
             --local              Use first configuration
             --enterprise         Use first configuration
             --secondary          Use second configuration
             --remote             Use second configuration
             --cluster            Use second configuration
             --verbose            Display non-zero retry counts
                                  and LDAP errors
Considerations
-
Aliases for primary include enterprise and local. Aliases for secondary include cluster and remote. If no configuration is specified, primary is assumed.
-
The equals sign is required when supplying a value to username or password.
-
To be prompted for a password value with no echo, specify the password argument but omit the equals sign and value.
-
Passwords that contain special characters may need to be escaped if the password is specified on the command line or within a script file.
-
If the password keyword is not specified, only the username is checked. The tool can therefore be used to test the LDAP configuration and connection to the configured LDAP server(s) without knowing a valid username or password.
11.2.5. Verifying contents of configuration file through ldapconfigcheck
This page describes the ldapconfigcheck tool, which validates the syntactic correctness of a Trafodion authentication configuration file. Trafodion does not need to be running to run the tool.
Considerations
If the configuration filename is not specified, then the tool looks for a file using environment variables. Those environment variables and the search order are:
-
TRAFAUTH_CONFIGFILEA fully qualified name is expected.
-
TRAFAUTH_CONFIGDIRFilename
.traf_authentication_config/is appended to the specified directory -
TRAF_HOME/sql/scripts/.traf_authentication_configis appended to the value ofTRAF_HOME.
Errors
One of the following is output when the tool is run. Only the first error encountered is reported.
| Code | Text |
|---|---|
0 |
File |
1 |
File |
2 |
File: |
3 |
File: |
4 |
File: |
5 |
File: |
6 |
File: |
7 |
No file provided. Either specify a file parameter or verify environment variables. |
8 |
TLS was requested in at least one section, but |
9 |
Missing host name in at least one section. |
10 |
Missing unique identifier in at least one section. |
11 |
At least one LDAP connection configuration section must be specified. |
12 |
Internal error parsing |
11.3. Manage Users
Kerberos is enabled for installations that require a secure Hadoop environment. LDAP is enabled to enforce authentication for any user connecting to Trafodion. The Trafodion database enforces privileges on the database, database schemas, database objects (table, views, etc) and database operations. Privileges are enforced when authorization is enabled. When LDAP or Kerberos is enabled, authorization is automatically enabled.
To determine the status of authentication and authorization, bring up sqlci and perform "env;".
>>env;
----------------------------------
Current Environment
----------------------------------
AUTHENTICATION     enabled
AUTHORIZATION      enabled
CURRENT DIRECTORY  /.../trafodion/install/installer
LIST_COUNT         4294967295
LOG FILE
MESSAGEFILE        /.../trafodion/core/sqf/export/ ...
MESSAGEFILE LANG   US English
MESSAGEFILE VRSN   {2016-06-14 22:27 LINUX:host/user}
SQL CATALOG        TRAFODION
SQL SCHEMA         SCH
SQL USER CONNECTED user not connected
SQL USER DB NAME   SQLUSER1
SQL USER ID        33367
TERMINAL CHARSET   ISO88591
TRANSACTION ID
TRANSACTION STATE  not in progress
WARNINGS           on
Once authorization is enabled, there is one predefined database user called DB__ROOT associated with your specified LDAP username. Please connect to the database and this user and register users that will perform database admin management. The database admin can then connect and setup required users, roles, and privileges.
TBD - A future update should include a pointer to the security best practices guide.
To learn more about how to register users, grant object and component privileges, and manage users and roles, please see the Trafodion SQL Reference Manual.